So here is my latest project. I cannot wait to make a bunch more of these. It was so fun and I am happy with the way it tuned out. I made this as a birthday gift for a good friend. It is her last name, the names of everyone in thier family and fun words describing them.
I started with a board that looked like this, only bigger and a different style, but you get the idea. It is an unpainted cabinet door.
I taped the inside part with (blue) painters tape as I wanted to keep that portion unpainted. I then painted the border black and the inside white. I used latex paint and primer all in one. Primer is important. If you do not have a paint plus primer make sure you do a layer of primer before you paint and let it dry thoroughly. You will be much happier with your final project if you prime first. It will also require less coats of paint to cover your board. I did two coats on the border and two coats on the inside. Your base color on the inside is the color you want your lettering to be when your project is complete.
I had laid out my design and cut it with my Cameo, weeded it and applied transfer tape. Make sure you use a color of vinyl that contrasts with both colors of paint you will be using. Use removable vinyl so it peels off easier. You can use contact paper as well, it is less expensive. I prefer the removable vinyl though as I think it removes easier later one. It will make peeling it off when the time comes easier
Once my paint for my base coats had dried thoroughly I laid the transfer tape with my vinyl design on my board, rubbed it down well and peeled it off.
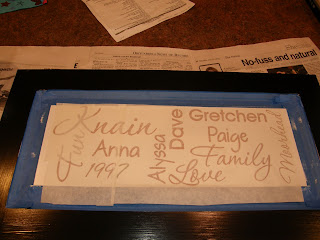
This is what the applied vinyl looks like.
Then I do another layer of my base color over the top. I actually did two layers to be sure, but one should be just fine. I am a bit of a perfectionist. This will seal around the edges of the vinyl letters and if any paint bleeds through onto your letters, it will be the same color and you won't be able to see it. This will guarantee your final product has a crisp, clean look with no bleeds!!
You then apply your background color to the top of that. I did two layers of black. When I paint I do not lay it one thick. Less is more!
Let it dry thoroughly, then peel off all of your vinyl letters.
Now this looked way to crisp, clean and shiny to me.
So when I finished removing all my vinyl and peeled off my painters tape I took my mouse sander to it and sanded the crap out of it. Way better, I prefer the distressed look.
Make sure you distress your edges as well.
I also put a layer of matte sealer on it. I use this one. I do not like a glossy look.
TADA
VIOLA, final product. I hope my friend Gretchen likes it!!
Now go make your own fun signs, the sky is the limit!! Thanks for looking!


