

Lessons learned on my first over-sized vinyl project. When I say over-sized, I am not talking truck trailer size or anything. No, just larger than the 12 x 24 mat. Well I did it, although I had a couple bumps in the road; actually more like one huge pothole!! But I'll get to that in a minute. Well, here is the final look. My mom decorated her husband's bathroom as a surprise when he was in Sturgis a few weeks ago for the motorcycle rally. Finished size is about 35" x 19." The font is MS Segue. The swirls are from SCAL and the Harley Logo is an SVG. Before loading up my contribution to the newly redecorated bathroom and taking it to mom's house, I pieced it together on my patio door.
I learned a couple valuable lessons while doing this project. First, reference marks are gold. I used diamonds in order to line up the different sections of the picture. Totally great. It went together like a dream. Now the pothole. I learned that the wet method for applying vinyl does not work so good with 631 vinyl on a wall. Fortunately, I also learned that if your wet method application goes bad, a blow dryer will cure all evil, aka, dry it up (the vinyl and the wall) so you can start all over again. No harm no foul!!
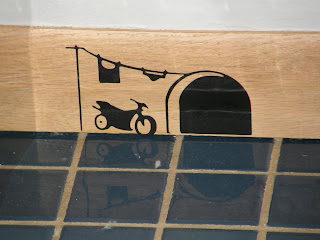
Finally, the mouse hole on the trim is my own little touch. I forgot to mention his bathroom is also the laundry room, hence the clothes line with the motorcycle parked outside. This is an SVG file. I am not going to post it here as it is not my design (I added the motorcycle.) But, you can find a photo of the mouse hole here (traceable in SCAL): http://www.hu2.com/store/living-room/mickey-pack.html and a TON more inspiration at the site. You have to go check out the great designs they have!!
Looks Great!
ReplyDeleteGreat Job! Thanks for sharing.... and giving tips!
ReplyDeleteLove your blog too!
Sue (from cricut vinyl blog)
Which wet method were you using? A little dish soap in the water or the pre made spray stuff? Love the sign!
ReplyDeleteThe wet method I used was a light spritz of water with a little dish soap on the back of the vinyl prior to application. It was very light. I don't think it was the 631 vinyl that gave me the problem, I think it was the wall. It was a matte finish paint on sheetrock and I think the water was absorbed into the wall instead of squeegeed out the back which made it difficult to stick. I hit both the wall and the back of the viyl with the blow dryer about 15 seconds each and that took care of the problem.
ReplyDeleteThanks for the nice comments!!
This is the first time I have seen your blog, and I have to say that I laughed out loud when I saw the mouse hole with the motorcycle. How funny!!! I can't wait to browse around and see what else you have posted!
ReplyDeleteThanks for sharing this!
Kelly
www.kellyjoskreations.com
This is the first time I've seen your blog also and I'm loving what I see! I have a question (actually 2 questions) about the Harley Davidson design. What font did you use and where can I find the Harley logo?
ReplyDeleteThanks!!
Hi Debbie. I dowloaded the Harley logo in jpg format and traced it in SCAL. I can't post it as it is a copyrighted image. Send me an e-mail and I will try and help ya out!!
ReplyDeletemwinkis@yahoo.com
this is too cute. first time on your blog. going to explore. i need to try the wet method. I have been making glass block lites and i hope this will help eliminate bubbles. thanks.
ReplyDelete